2021年11月16日 星期二

ESP32 + PIR + servo motor 充電式非接觸性感應垃圾桶

以手上ESP32板子為主架構搭配PIR HC-SR505 sensor感應去控制servo motor旋轉角度另添加一塊充電模組可以完成一個感應垃圾桶!!

Figure1 PIR HC-SR505

Figure2 充電鋰電池

Figure3 ESP32
                                                                   

Figure4 充電板
Figure5 整體架構

演示影片


2021年9月27日 星期一

Arduino與硬碟無刷直流馬達(BLDC)正反轉測試


 將手上一顆壞掉的硬碟拆掉有一顆無刷直流馬達

上網找一下 最簡單的控制方式是用一無刷電變來控制!!


若要實現正反轉只要將輸出的UWV任意兩條線交換就可以反轉想到最簡單的方式是用RELAY 下去 做切換


2021年8月13日 星期五

Raspberry學習- python tkinter GUI 設計

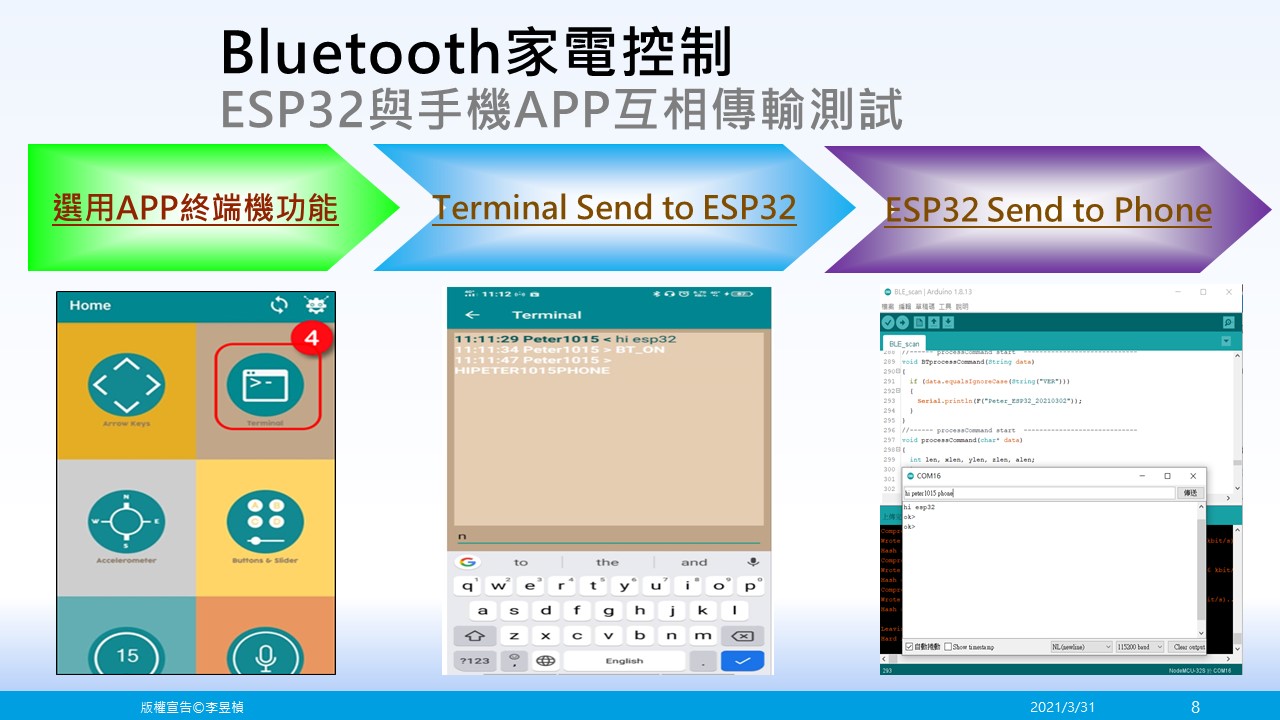
目的: 設計一個GUI介面 包含兩個 UART 控制, 一個影像輸出, 一個畫radar偵測點的區域, 最右側為指令輸出與接收到的訊息視窗

UART1為arduino的控制port

UART2為radar console port

下面為windows跟樹莓派共用抓取com port 的code

def serial_ports():
    # return serial.tools.list_ports.comports()
    if sys.platform.startswith('win'):
        ports = ['COM%s' % (i + 1for i in range(256)]
    elif sys.platform.startswith('linux'or sys.platform.startswith('cygwin'):
        # this excludes your current terminal"/dev/tty"
        ports = glob.glob('/dev/tty[A-Za-z]*')
        port_list = list(serial.tools.list_ports.comports())
        print(len(port_list), 'ports found')
    elif sys.platform.startswith('darwin'):
        ports = glob.glob('/dev/tty.*')
    else:
        raise EnvironmentError('Unsupported platform')

    result = []

    for port in ports:
        try:
            ser = serial.Serial(port9600)
            ser.close()
            result.append(port)
        except (OSErrorserial.SerialException):
            pass
    return result

windows 上執行
樹莓派上執行


2021年4月28日 星期三

Raspberry學習- 增加一個power off按鍵

若沒連上Raspberry時, 要將它正常關機! 想到的是增加一個按鍵透過GPIO去作動!!

利用Raspberry Pi 的 GPIO 3,焊接在按鈕開關的正極;另一端將 Ground 焊接在按鈕開關的負極

接下來編輯檔案

sudo nano /etc/xdg/lxsession/LXDE-pi/autostart

在檔案最後增加一行

@sh /home/pi/autostart.sh

============================================

autostart.sh 內容為下三行

#!/bin/bash

cd /home/pi/

sudo python3 halt.py

=============================================

halt.py內容如下

#!/usr/bin/python3

# Import Libraries

import RPi.GPIO as GPIO

import subprocess

# Define GPIO Pin Number

gpioPin=3

# Define GPIO Function

GPIO.setmode(GPIO.BCM)

GPIO.setup(gpioPin, GPIO.IN)

GPIO.wait_for_edge(gpioPin, GPIO.FALLING)

# Command

subprocess.call(['shutdown', '-h', 'now'], shell=False)

=================================================
最後給予 autostart.sh 檔案執行權限

sudo chmod +x /home/pi/autostart.sh

重新開機 測試一下 按鍵是否動作OK!


2021年4月25日 星期日

Raspberry學習- Anydesk 遠端控制

 最近開始將 我的樹莓派應用文章 有些特別的設定 紀錄一下


我的Pi3與Pi4 合影

首先 將遠端控制的AnyDesk 安裝進來, 一些 遠端控制如 VNC or 遠端桌面 等.  我還是喜歡用Anydesk

1. Download the .deb file from https://anydesk.com/download?os=raspi

2. Go to the downloaded location, where you have download the file “anydesk_5.5.5-1_armhf.deb”

3. 安裝 sudo dpkg -i anydesk_5.5.5-1_armhf.deb

4. 安裝 sudo apt-get -f install

用電腦版Anydesk 連進 Pi4

在手機端也有 AnyDesk可以用非常方便 


2021年4月12日 星期一

ESP32溫濕度網路時鐘

        繼用ESP32改造家中天花板的LED燈後, 想說用 ESP32來做一個時鐘, 可以顯示日期時間, 溫度, 濕度, PM2.5等的資訊!

        最簡單的架構, 一片ESP32加上顯示板!

顯示板上網搜尋後, 決定用這種 RGB LED Matrix

硬體零件決定後, 開始軟體的編成

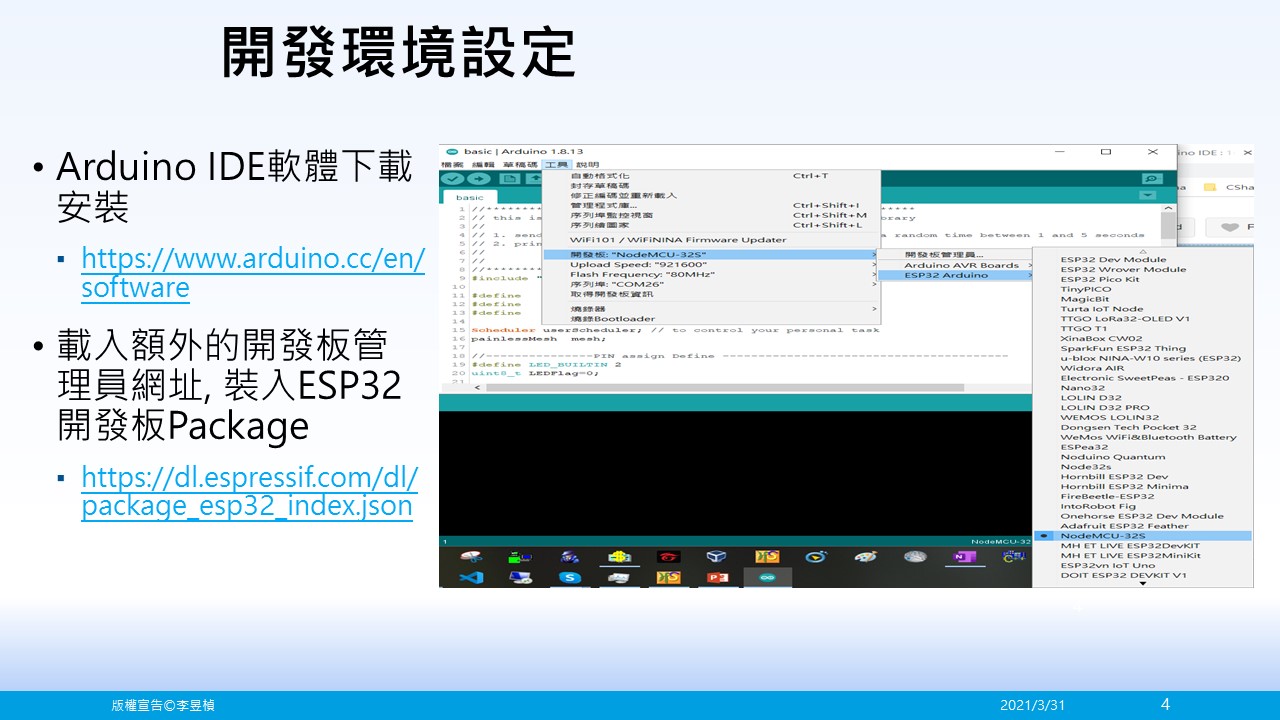
1. 首先還是將Arduino IDE載入額外的開發板管理員網址, 裝入ESP32開發板Package

https://dl.espressif.com/dl/package_esp32_index.json

2. RGB Led Matrix 顯示的 library
3. 接下來這個步驟很重要 
需要在RGB matrix Panel的libeary將原先
//static const uint8_t defaultrgbpins[] = {2, 3, 4, 5, 6, 7};改為
static const uint8_t defaultrgbpins[] = {25, 26, 27, 21, 22, 23};
以下 為我的IO設定
//------------------------------------------------------------------------
#define A   12
#define B   13
#define C   14
#define D   15
#define CLK 4
#define LAT 2
#define OE  0

RGBmatrixPanel matrix(A, B, C, D, CLK, LAT, OE, false, 64);

4. 將範例中的testshapes32*64 demo上傳到板子就可以出現下面畫面
5. ESP32 NTP的寫法
可參考網路上資料如
https://lastminuteengineers.com/esp32-ntp-server-date-time-tutorial/
https://randomnerdtutorials.com/esp32-ntp-client-date-time-arduino-ide/


2021年3月31日 星期三

NodeMCU-32S (WiFi Mesh 與 BT BLE應用)


NodeMCU-32S架構

將ESP32開發板加入IDE裡面


將家中天花板的LED改裝成, Mesh 網路中的一個Node, 用手機控制開關