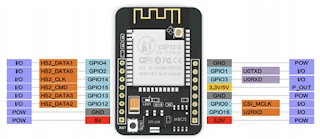
在這篇文章中 ESP32與香氛機的邂逅 用ESP32改裝傳送資訊, 進階來利用ESP32CAM來偵測並且透過linenotify 傳送拍攝的照片
//-----------------程式碼--------------------------------------------
#include <WiFi.h>
#include <WiFiClientSecure.h>
#include "soc/soc.h" //用於電源不穩不重開機
#include "soc/rtc_cntl_reg.h" //用於電源不穩不重開機
#include "esp_camera.h" //視訊函式
// Enter your WiFi ssid and password
const char* ssid = "Your_SSID"; //your network SSID
const char* password = "Your_Password"; //your network password
String lineNotifyToken = "Your_Token"; //Line Notify Token
//ESP32-CAM 安信可模組腳位設定
#define PWDN_GPIO_NUM 32
#define RESET_GPIO_NUM -1
#define XCLK_GPIO_NUM 0
#define SIOD_GPIO_NUM 26
#define SIOC_GPIO_NUM 27
#define Y9_GPIO_NUM 35
#define Y8_GPIO_NUM 34
#define Y7_GPIO_NUM 39
#define Y6_GPIO_NUM 36
#define Y5_GPIO_NUM 21
#define Y4_GPIO_NUM 19
#define Y3_GPIO_NUM 18
#define Y2_GPIO_NUM 5
#define VSYNC_GPIO_NUM 25
#define HREF_GPIO_NUM 23
#define PCLK_GPIO_NUM 22
const int Led_Flash = 4;
int PIR_Sensor = 12;
boolean startTimer = false;
unsigned long time_now=0;
int time_capture=0;
void setup()
{
WRITE_PERI_REG(RTC_CNTL_BROWN_OUT_REG, 0); //關閉電源不穩就重開機的設定
Serial.begin(115200);
Serial.setDebugOutput(true); //開啟診斷輸出
Serial.println();
setupCam();
//-----------------------------
pinMode(Led_Flash, OUTPUT);
pinMode(PIR_Sensor, INPUT);
//---------------------------------
//閃光燈(GPIO4)
ledcAttachPin(Led_Flash, 4);
ledcSetup(Led_Flash, 5000, 8);
WiFi.mode(WIFI_AP_STA); //其他模式 WiFi.mode(WIFI_AP); WiFi.mode(WIFI_STA);
//指定Client端靜態IP
//WiFi.config(IPAddress(192, 168, 201, 100), IPAddress(192, 168, 201, 2), IPAddress(255, 255, 255, 0));
for (int i=0;i<2;i++) {
WiFi.begin(ssid, password); //執行網路連線
delay(1000);
Serial.println("");
Serial.print("Connecting to ");
Serial.println(ssid);
long int StartTime=millis();
while (WiFi.status() != WL_CONNECTED) {
delay(500);
if ((StartTime+5000) < millis()) break; //等待10秒連線
}
if (WiFi.status() == WL_CONNECTED) { //若連線成功
Serial.println("");
Serial.println("STAIP address: ");
Serial.println(WiFi.localIP());
Serial.println("");
for (int i=0;i<5;i++) { //若連上WIFI設定閃光燈快速閃爍
ledcWrite(Led_Flash,10);
delay(200);
ledcWrite(Led_Flash,0);
delay(200);
}
break;
}
}
if (WiFi.status() != WL_CONNECTED) { //若連線失敗
for (int i=0;i<2;i++) { //若連不上WIFI設定閃光燈慢速閃爍
ledcWrite(Led_Flash,10);
delay(1000);
ledcWrite(Led_Flash,0);
delay(1000);
}
ESP.restart();
}
//設定閃光燈為低電位
pinMode(Led_Flash, OUTPUT);
digitalWrite(Led_Flash, LOW);
//傳送影像
//sendCapturedImage2LineNotify(lineNotifyToken);
/***
//傳送影像
Serial.println(sendCapturedImage2LineNotify(lineNotifyToken));
//傳送文字
Serial.println(sendRequest2LineNotify(lineNotifyToken, "message=\nHello\nWorld"));
//傳送貼圖
Serial.println(sendRequest2LineNotify(lineNotifyToken, "message=Hello World&stickerPackageId=1&stickerId=2"));
//傳送網址
String imageThumbnail = "https://s2.lookerpets.com/imgs/202008/14/11/15973742786521.jpg";
String imageFullsize = "https://i.ytimg.com/vi/WLUEXiTAPaI/maxresdefault.jpg";
Serial.println(sendRequest2LineNotify(lineNotifyToken, "message=Hello World&imageThumbnail="+imageFullsize+"&imageFullsize="+imageThumbnail));
**/
}
void loop()
{
int v = digitalRead(PIR_Sensor);
if (v == 1) {
//傳照片
ledcWrite(Led_Flash,10);
delay(1000);
Serial.println("starting to Line");
sendCapturedImage2LineNotify(lineNotifyToken);
ledcWrite(Led_Flash,0);
delay(10000);//傳送後休息5秒
}
delay(2000); //You could only send up to 50 images to Line Notify in one hour.
}
//鏡頭設定
void setupCam() {
// #define CAMERA_MODEL_AI_THINKER
//視訊組態設定 https://github.com/espressif/esp32-camera/blob/master/driver/include/esp_camera.h
camera_config_t config;
config.ledc_channel = LEDC_CHANNEL_0;
config.ledc_timer = LEDC_TIMER_0;
config.pin_d0 = Y2_GPIO_NUM;
config.pin_d1 = Y3_GPIO_NUM;
config.pin_d2 = Y4_GPIO_NUM;
config.pin_d3 = Y5_GPIO_NUM;
config.pin_d4 = Y6_GPIO_NUM;
config.pin_d5 = Y7_GPIO_NUM;
config.pin_d6 = Y8_GPIO_NUM;
config.pin_d7 = Y9_GPIO_NUM;
config.pin_xclk = XCLK_GPIO_NUM;
config.pin_pclk = PCLK_GPIO_NUM;
config.pin_vsync = VSYNC_GPIO_NUM;
config.pin_href = HREF_GPIO_NUM;
config.pin_sscb_sda = SIOD_GPIO_NUM;
config.pin_sscb_scl = SIOC_GPIO_NUM;
config.pin_pwdn = PWDN_GPIO_NUM;
config.pin_reset = RESET_GPIO_NUM;
config.xclk_freq_hz = 20000000;
config.pixel_format = PIXFORMAT_JPEG;
//
// WARNING!!! PSRAM IC required for UXGA resolution and high JPEG quality
// Ensure ESP32 Wrover Module or other board with PSRAM is selected
// Partial images will be transmitted if image exceeds buffer size
//
// if PSRAM IC present, init with UXGA resolution and higher JPEG quality
// for larger pre-allocated frame buffer.
if(psramFound()){ //是否有PSRAM(Psuedo SRAM)記憶體IC
config.frame_size = FRAMESIZE_UXGA;
config.jpeg_quality = 10;
config.fb_count = 2;
} else {
config.frame_size = FRAMESIZE_SVGA;
config.jpeg_quality = 12;
config.fb_count = 1;
}
//視訊初始化
esp_err_t err = esp_camera_init(&config);
if (err != ESP_OK) {
Serial.printf("Camera init failed with error 0x%x", err);
ESP.restart();
}
//可自訂視訊框架預設大小(解析度大小)
sensor_t * s = esp_camera_sensor_get();
// initial sensors are flipped vertically and colors are a bit saturated
if (s->id.PID == OV3660_PID) {
s->set_vflip(s, 1); // flip it back
s->set_brightness(s, 1); // up the brightness just a bit
s->set_saturation(s, -2); // lower the saturation
}
// drop down frame size for higher initial frame rate
s->set_framesize(s, FRAMESIZE_SVGA); //解析度 UXGA(1600x1200), SXGA(1280x1024), //XGA(1024x768), SVGA(800x600), VGA(640x480), CIF(400x296), QVGA(320x240), //HQVGA(240x176), QQVGA(160x120), QXGA(2048x1564 for OV3660)
//s->set_vflip(s, 1); //垂直翻轉
//s->set_hmirror(s, 1); //水平鏡像
//s->set_pRotation(s, 1); //0=不旋轉 1-轉90度 2- 轉180度 3-轉270
}
String sendCapturedImage2LineNotify(String token) {
camera_fb_t * fb = NULL;
fb = esp_camera_fb_get();
if(!fb) {
Serial.println("Camera capture failed");
delay(1000);
ESP.restart();
return "Camera capture failed";
}
WiFiClientSecure client_tcp; //啟動SSL wificlient
client_tcp.setInsecure(); //run version 1.0.5 or above
Serial.println("Connect to notify-api.line.me");
if (client_tcp.connect("notify-api.line.me", 443)) {
Serial.println("Connection successful");
String message = "ESP32-CAM";
String head = "--Taiwan\r\nContent-Disposition: form-data; name=\"message\"; \r\n\r\n" + message + "\r\n--Taiwan\r\nContent-Disposition: form-data; name=\"imageFile\"; filename=\"esp32-cam.jpg\"\r\nContent-Type: image/jpeg\r\n\r\n";
String tail = "\r\n--Taiwan--\r\n";
uint16_t imageLen = fb->len;
uint16_t extraLen = head.length() + tail.length();
uint16_t totalLen = imageLen + extraLen;
//開始POST傳送訊息
client_tcp.println("POST /api/notify HTTP/1.1");
client_tcp.println("Connection: close");
client_tcp.println("Host: notify-api.line.me");
client_tcp.println("Authorization: Bearer " + token);
client_tcp.println("Content-Length: " + String(totalLen));
client_tcp.println("Content-Type: multipart/form-data; boundary=Taiwan");
client_tcp.println();
client_tcp.print(head);
uint8_t *fbBuf = fb->buf;
size_t fbLen = fb->len;
Serial.println("Data Sending....");
//檔案太大,分段傳送
for (size_t n=0;n<fbLen;n=n+1024) {
if (n+1024<fbLen) {
client_tcp.write(fbBuf, 1024);
fbBuf += 1024;
}
else if (fbLen%1024>0) {
size_t remainder = fbLen%1024;
client_tcp.write(fbBuf, remainder);
}
}
client_tcp.print(tail);
client_tcp.println();
esp_camera_fb_return(fb);
String getResponse="",Feedback="";
int waitTime = 10000; // timeout 10 seconds
long startTime = millis();
boolean state = false;
while ((startTime + waitTime) > millis()) {
Serial.print(".");
delay(100);
while (client_tcp.available()) { //當有收到回覆資料時
char c = client_tcp.read();
if (state==true) Feedback += String(c);
if (c == '\n') {
if (getResponse.length()==0) state=true;
getResponse = "";
}
else if (c != '\r')
getResponse += String(c);
startTime = millis();
}
if (Feedback.length()>0) break;
}
Serial.println();
client_tcp.stop();
return Feedback;
}
else {
return "Connected to notify-api.line.me failed.";
}
}
String sendRequest2LineNotify(String token, String request) {
request.replace("%","%25");
request.replace(" ","%20");
//request.replace("&","%20");
request.replace("#","%20");
//request.replace("\'","%27");
request.replace("\"","%22");
request.replace("\n","%0D%0A");
request.replace("%3Cbr%3E","%0D%0A");
request.replace("%3Cbr/%3E","%0D%0A");
request.replace("%3Cbr%20/%3E","%0D%0A");
request.replace("%3CBR%3E","%0D%0A");
request.replace("%3CBR/%3E","%0D%0A");
request.replace("%3CBR%20/%3E","%0D%0A");
request.replace("%20stickerPackageId","&stickerPackageId");
request.replace("%20stickerId","&stickerId");
WiFiClientSecure client_tcp;
client_tcp.setInsecure(); //run version 1.0.5 or above
Serial.println("Connect to notify-api.line.me");
if (client_tcp.connect("notify-api.line.me", 443)) {
Serial.println("Connection successful");
Serial.println(request);
client_tcp.println("POST /api/notify HTTP/1.1");
client_tcp.println("Connection: close");
client_tcp.println("Host: notify-api.line.me");
client_tcp.println("User-Agent: ESP8266/1.0");
client_tcp.println("Authorization: Bearer " + token);
client_tcp.println("Content-Type: application/x-www-form-urlencoded");
client_tcp.println("Content-Length: " + String(request.length()));
client_tcp.println();
client_tcp.println(request);
client_tcp.println();
String getResponse="",Feedback="";
boolean state = false;
int waitTime = 3000; // timeout 3 seconds
long startTime = millis();
while ((startTime + waitTime) > millis()) {
Serial.print(".");
delay(100);
while (client_tcp.available()) {
char c = client_tcp.read();
if (state==true) Feedback += String(c);
if (c == '\n') {
if (getResponse.length()==0) state=true;
getResponse = "";
}
else if (c != '\r')
getResponse += String(c);
startTime = millis();
}
if (getResponse.length()>0) break;
}
Serial.println();
client_tcp.stop();
return Feedback;
}
else
return "Connection failed";
}
//--------------------------code end----------------------------------
實作影片 Yortube
//------------------------------------------------------------
若有問題歡迎留言討論!!!
//------------------------------------------------------------


